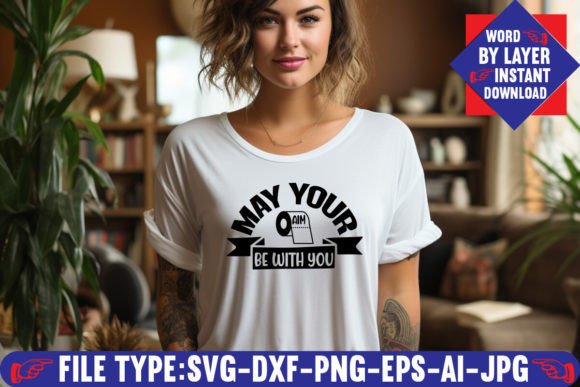
May Your Aim Be with You SVG Design – What to Know Before You Download and Create
If you’ve come across the May Your Aim Be with You SVG Design, you’re likely drawn to its clever phrasing and versatile style. Whether you’re crafting a gift, branding a product, or adding personality to a project, this design has a meaningful message that resonates with many. But before you hit download, it’s worth understanding exactly what you’re getting, how to use it properly, and where people often trip up. This article walks through the common mistakes and overlooked details so you can make the most of your purchase without frustration or wasted material.
What Exactly Is the May Your Aim Be with You SVG Design?
This is a digital design file, not a physical product. You purchase a set of files that you download and then use with your own equipment to create physical items like T-shirts, mugs, wall art, or stickers. The design itself typically features the phrase “May Your Aim Be with You” in an artistic layout, often paired with symbolic imagery like arrows, targets, or celestial motifs. It appeals to archery enthusiasts, fantasy fans, or anyone who appreciates a thoughtful, goal-oriented sentiment.
The key detail to remember is that you are buying the right to use the design file — not a finished product. This distinction is where many beginners and even experienced crafters make assumptions that lead to problems later.
Understanding Your Download: What’s Actually in the .zip File
When you purchase the May Your Aim Be with You SVG Design, your download includes one .zip folder containing six files. Each serves a specific purpose, and using the wrong one for your project is one of the most common mistakes people make. Here is what you get:
- 1 Ai File (Adobe Illustrator Source File) – This is the editable master file. If you own Adobe Illustrator, you can open this to tweak colors, resize elements, or modify the text. For those who design professionally, this is the file you will want to keep as your source of truth.
- 1 SVG File (Word By Layer SVG Cut File) – The SVG is the most versatile file in the set. It is a vector format that works with cutting machines like Cricut and Silhouette, as well as with design software like Inkscape, Adobe Illustrator, and Adobe Photoshop. This should be your go-to for most cutting and scaling tasks.
- 1 PNG File (300 DPI, Background Transparent) – The PNG is a raster image with a transparent background. Use this when you need a ready-to-print image without a white box around it. It’s ideal for print-on-demand mockups, digital presentations, or quick previews. Because it is 300 DPI, it will print cleanly at most sizes.
- 1 EPS File (Editable Vector File) – The EPS is another vector format, widely compatible with older design software and professional printing workflows. If you work with CorelDRAW, QuarkXPress, or other legacy tools, this file will be your best friend.
- 1 DXF File – The DXF format is sometimes required by older cutting machines or specific CAD-like software. If your machine manual mentions DXF, this is the file to use. Some Cricut and Silhouette users also prefer DXF for certain line-detection settings.
- 1 JPEG File – The JPEG is a standard image format with a white background. It works for quick previews, social media posts, or printing on white backgrounds. Just remember that it does not have transparency, so it will show a white rectangle around the design if layered over other colors.
Many people open the JPEG or PNG and try to use it directly in their cutting software, not realizing that the SVG or DXF would give them a much cleaner cut line. Others try to open the AI or EPS in free software that does not support those formats, and then assume the file is broken. Knowing which file to use for which task saves time and frustration.
Common Mistake #1: Treating This Like a Physical Product
The most frequent misunderstanding is assuming that after purchase, you will receive something in the mail. The May Your Aim Be with You SVG Design is a digital download only — no physical product ships. This is clearly stated, but it is easy to overlook when you are excited about a project.
Why this matters: If you expect a printed sticker or a cut vinyl decal to arrive, you will be disappointed. Instead, you need to have the right equipment (a cutting machine, printer, or design software) and the right materials (vinyl, transfer tape, heat press, or printable paper) to turn the file into a physical item. Without that setup, the file is just a digital asset.
Better approach: Before you buy, check that you have access to a compatible device. A simple home inkjet printer can work with the PNG or JPEG for paper projects. For vinyl cutting, you will need a Cricut, Silhouette, or similar machine, plus the correct blade settings and material.
Common Mistake #2: Using the Wrong File Format for Your Machine
Each cutting machine and software program has its own preferred file formats. Using a JPEG or PNG in a cutting program often results in poor cut lines, extra work tracing the design, or outright failure to recognize the image.
Real example: A user opens the PNG in Cricut Design Space, tries to use the “Print Then Cut” feature, and wonders why the design looks fuzzy or does not cut along the edges properly. The PNG is designed for printing, not for cutting around complex shapes. The SVG or DXF, on the other hand, would have given them a clean vector path that the machine can follow precisely.
Better approach: For cutting machines, always use the SVG file first. If your machine does not support SVG, try the DXF. For print-only projects (like iron-on transfers on white fabric), the PNG with a transparent background is perfect. For editing and resizing, use the AI or EPS file if you have the software. Keep this hierarchy in mind and you will avoid most file-related headaches.
Common Mistake #3: Overlooking Layer Organization in the SVG
The SVG file is “word by layer,” meaning each element of the design — each letter, shape, or decorative piece — sits on its own layer. This is a huge advantage because it lets you customize the design easily. You can change the color of individual letters, remove a decorative element, or resize parts independently.
However, if you import the SVG into a program that does not preserve layers, or if you flatten the image without thinking, you lose that flexibility. Some users then complain that they cannot change colors or that the design looks different than expected.
Why this matters: The layered structure is a feature, not a bug. It gives you control over the final look. If you want the word “Aim” in gold and the rest of the phrase in white, you can do that easily — if you work with the layered file correctly.
Better approach: Open the SVG in a program that supports layers: Adobe Illustrator, Inkscape, Affinity Designer, or Cricut Design Space (which handles layers well). Take a moment to look at the layer panel. Group related elements if you need to move them together, but avoid merging everything into one shape until you are absolutely sure about the final design.
Common Mistake #4: Ignoring DPI and Background Settings
The PNG file is 300 DPI with a transparent background. That is excellent for printing, but only if you use it correctly. Some users insert the PNG into a document that is set to 72 DPI, then wonder why the print quality is poor. Others assume the JPEG (which has a white background) will work the same as the PNG, and end up with a white box around their design when placing it on a dark shirt.
Better approach: For any printing project, always use the PNG (transparent background) and set your document to 300 DPI. If you need a white background, use the JPEG. For online use, where file size matters more than print quality, the JPEG or a downsized PNG will work fine. Understanding these small differences prevents wasted ink, ruined materials, and reprinting.
Common Mistake #5: Not Testing Before Cutting Final Materials
This mistake costs crafters real money. You have a beautiful design, you load your machine with expensive holographic vinyl, and you hit “go.” Halfway through, you realize the design is too large for your project, or the letters are too thin to weed properly, or the cut settings are wrong.
Better approach: Always do a test cut on scrap material — even a piece of copy paper or cheap vinyl. Check the size against your project. Try weeding a small section to see if the details hold up. Adjust blade depth, pressure, and speed based on your material. This simple step, using the May Your Aim Be with You SVG Design file, will save you from wasting high-end supplies on a failed first attempt.
Who Should Buy This Design?
This design works well for a wide range of creators:
- Small business owners making custom apparel or gifts
- Hobbyists who enjoy vinyl cutting or print-and-cut projects
- Educators or team leaders looking for a motivational phrase
- Anyone creating archery-themed or goal-oriented decor
If you fit any of these categories and you have the right tools, the May Your Aim Be with You SVG Design is a solid choice. Just remember that the quality of your final product depends as much on your materials and technique as on the file itself.
What to Check Before You Buy
Before you complete your purchase, take a few minutes to confirm these points:
- Your machine or software supports SVG, DXF, PNG, AI, or EPS. Most modern cutting machines accept SVG. If yours does not, check that the included DXF will work.
- You have a way to access the .zip file. Some mobile devices struggle with zip extraction. Download on a computer if possible.
- You understand the license terms. Most SVG designs allow personal and small commercial use, but you should verify whether you can sell items made from this design and whether credit is required.
- You have the right materials. For vinyl, choose permanent or removable depending on the surface. For iron-on, choose the correct heat transfer vinyl for your fabric type.
Final Thoughts
The May Your Aim Be with You SVG Design is a thoughtful, flexible design that can elevate many types of projects. But like any digital product, its value depends on how you use it. By understanding the differences between the six file types, respecting the layered structure, and testing before committing to expensive materials, you will get results that look professional and last. Avoid the common mistakes outlined here, and you will find that this design works smoothly from download to finished creation.